*This is the fourth part in our series, “Onggi, traditional earthenware vessel in Korea.”
Shaping the Pottery
An expert potter, a daejang in Korean, is one who can shape the raw clay.
A master potter makes the bottom of the urn first. This process is called the mulrekan in Korean. Afterward, he shapes the main body using a technique called geureutssatgi. He then shapes the mouth of the urn.
How to shape traditional pottery urns
Shaping the main body of the urn, the geureutssatgi process, can be started after the bottom of the urn is completed. There are two shaping techniques, depending on the size of the final product.
The first one is shaped from the base on up, a technique done by hand for smaller pottery artifacts. The second one is uses suitable tools and is generally used for larger urns. This tarimjil process for larger urns is done by smoothly shaping the surface of the pottery using a variety of tools, depending on the size and shape of the final product. This process, in turn, is broken up into three methods.
The first has the craftsman piling layer upon layer of rope-like clay strips, the tessatgi process. The second has the craftsman spiral one long rope-like clay strip upon itself, the seorigi process. Finally, the chetbakui tarim process, has the craftsman build walls, layer by layer, with long slaps of clay.
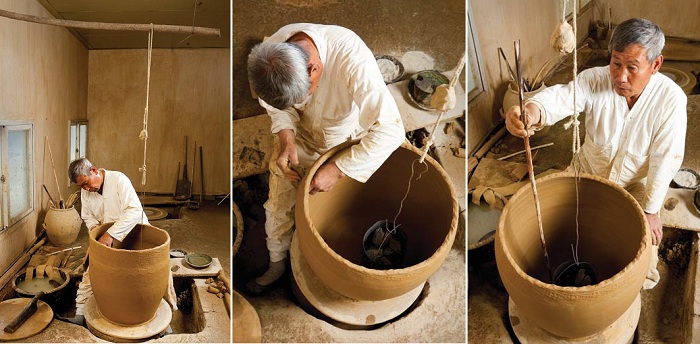
When shaping large urns, a wood charcoal-burning brazier is placed inside the half-finished pottery, helping to dry and shape the urn and at the same time prevent it from collapsing from the weight of the wet clay.
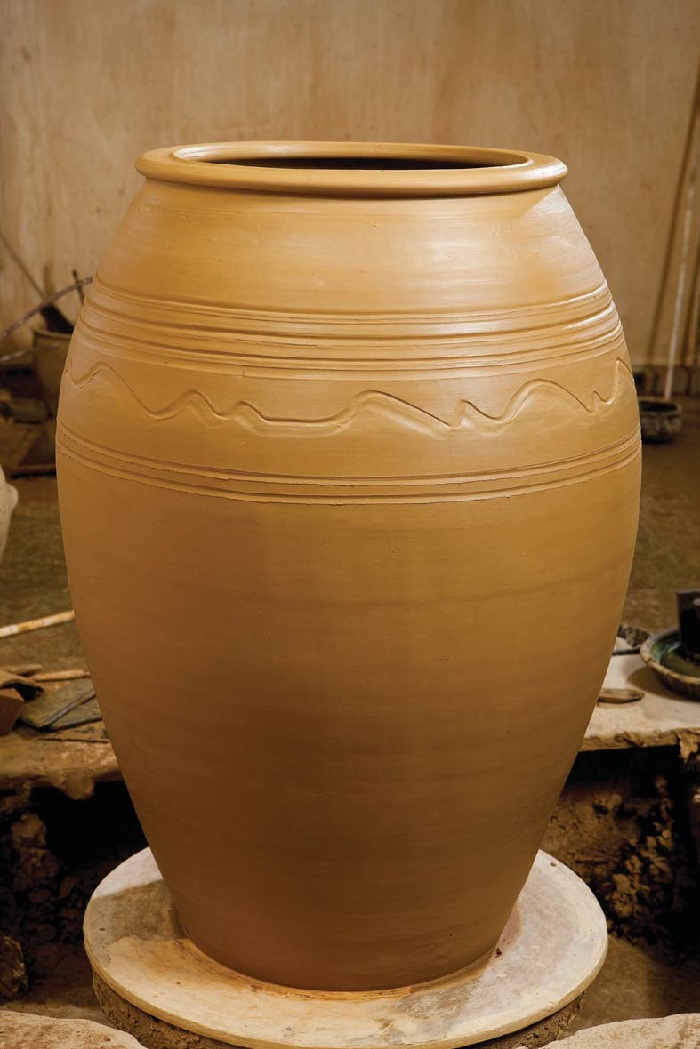
After the body of the urn is made, the rim around the mouth is shaped and finished with a touch of decoration above and below the body center. When the surface decoration is finished, the raw earthenware can be cut off of the potter's wheel to be dried.
Shaping the Bottom
Before the master potter sits down at his wheel, he spreads white clay powder over the surface of the potter's wheel to prevent the clay from sticking. The clay is padded down to the appropriate thickness for the bottom of the urn and, as the wheel spins, the craftsman uses a wooden knife to cut out the shape of the urn's underside.
*This series of article has been made possible through the cooperation of the National Research Institute of Cultural Heritage. (Source: Intangible Cultural Heritage of Korea)
Shaping the Pottery
An expert potter, a daejang in Korean, is one who can shape the raw clay.
A master potter makes the bottom of the urn first. This process is called the mulrekan in Korean. Afterward, he shapes the main body using a technique called geureutssatgi. He then shapes the mouth of the urn.
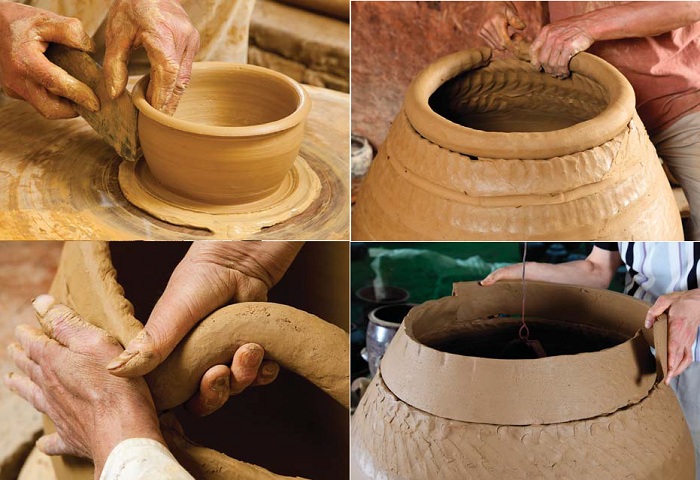
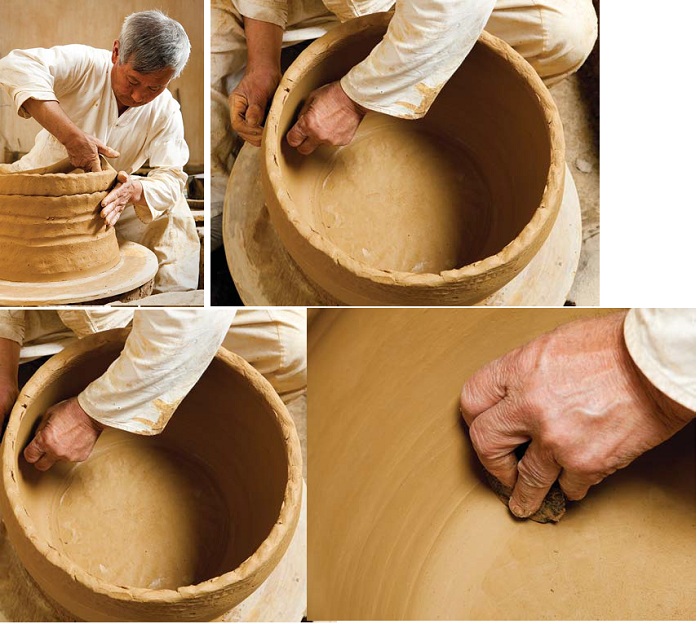
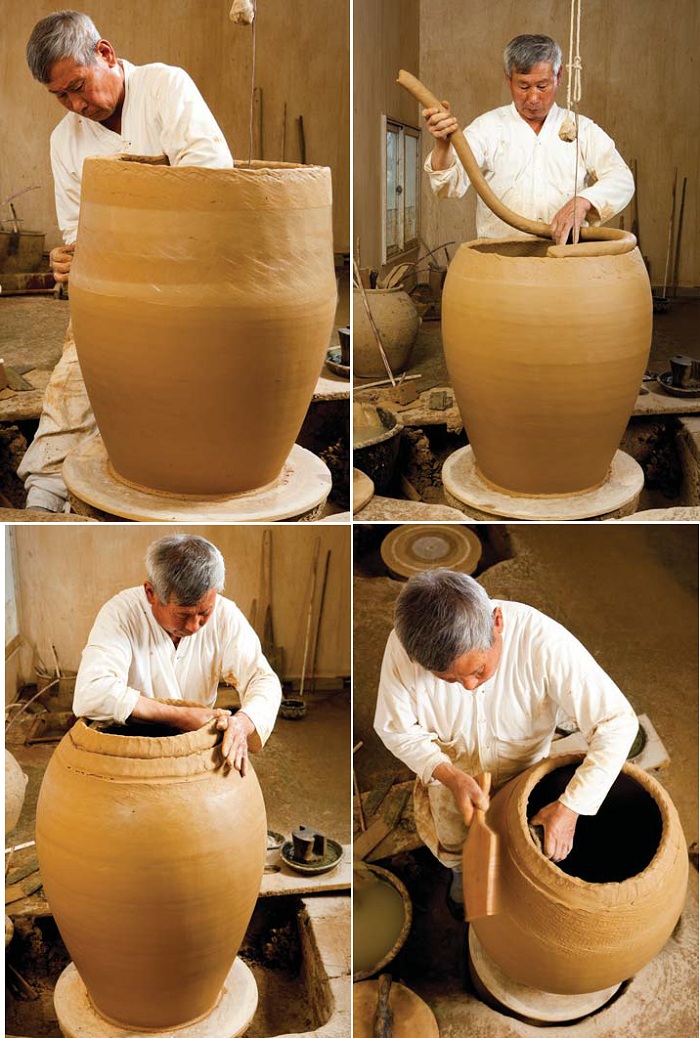
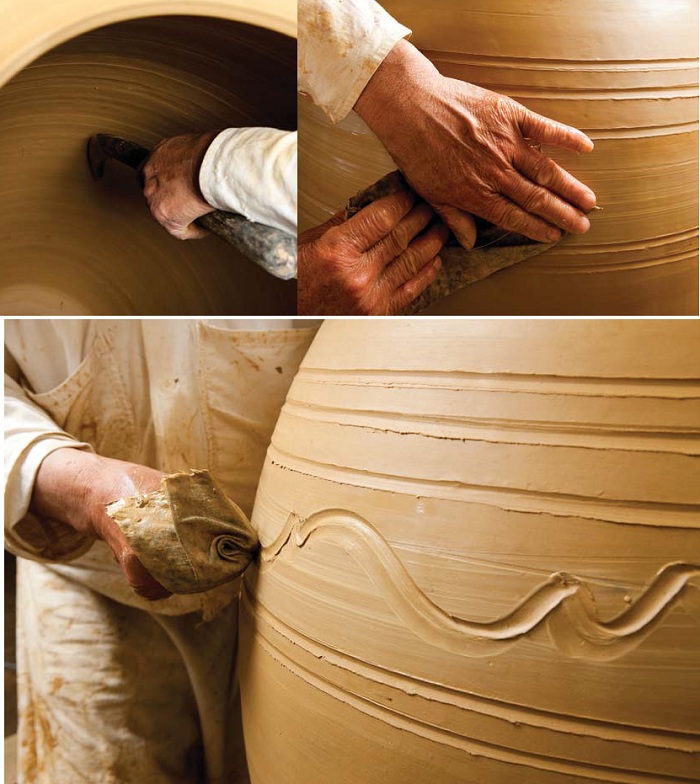
(Top,
left) The base of the urn is built up by hand; (Top, right) The sides
of the urn are built up by placing layer upon layer of long, round clay
strips; (Bottom, left) The urn is shaped with a spiral layer-upon-layer
construction of a long, cylindrical clay strip; (Bottom, right) The
sides are finished with a long, thin slab of shaped clay.
How to shape traditional pottery urns
Shaping the main body of the urn, the geureutssatgi process, can be started after the bottom of the urn is completed. There are two shaping techniques, depending on the size of the final product.
The first one is shaped from the base on up, a technique done by hand for smaller pottery artifacts. The second one is uses suitable tools and is generally used for larger urns. This tarimjil process for larger urns is done by smoothly shaping the surface of the pottery using a variety of tools, depending on the size and shape of the final product. This process, in turn, is broken up into three methods.
The first has the craftsman piling layer upon layer of rope-like clay strips, the tessatgi process. The second has the craftsman spiral one long rope-like clay strip upon itself, the seorigi process. Finally, the chetbakui tarim process, has the craftsman build walls, layer by layer, with long slaps of clay.
When shaping large urns, a wood charcoal-burning brazier is placed inside the half-finished pottery, helping to dry and shape the urn and at the same time prevent it from collapsing from the weight of the wet clay.
After the body of the urn is made, the rim around the mouth is shaped and finished with a touch of decoration above and below the body center. When the surface decoration is finished, the raw earthenware can be cut off of the potter's wheel to be dried.
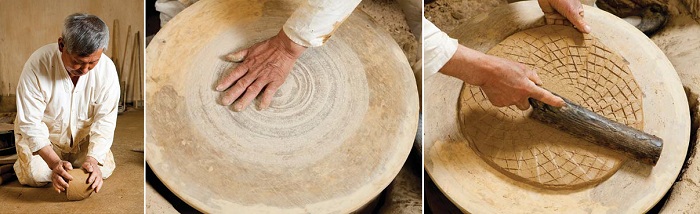
(1)
The bottom of the urn is begun with a simply lump of clay. (2) Spread
white clay powder over the surface of the potter's wheel to prevent the
clay from sticking. (3) Shape the bottom of the urn by pounding and
spreading the lump of clay with a roller pin-like tool.
Shaping the Bottom
Before the master potter sits down at his wheel, he spreads white clay powder over the surface of the potter's wheel to prevent the clay from sticking. The clay is padded down to the appropriate thickness for the bottom of the urn and, as the wheel spins, the craftsman uses a wooden knife to cut out the shape of the urn's underside.
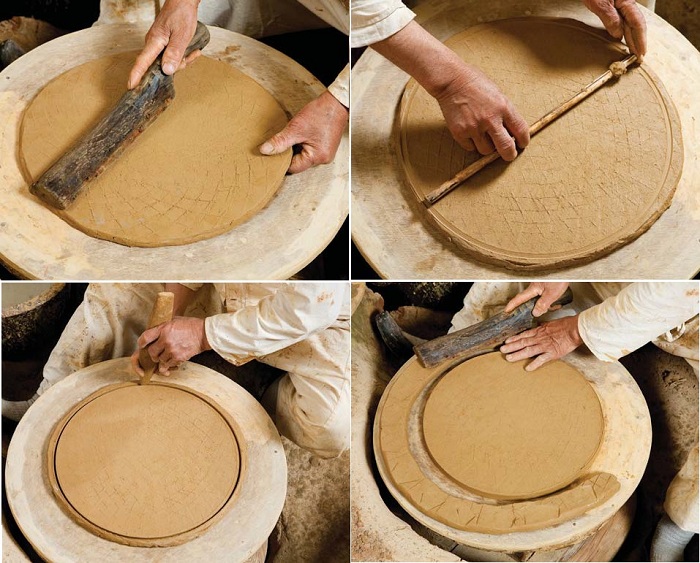
(4)
The bottom of the urn is shaped by pounding and spreading the clay with
a large roller pin-like tool. (5) The bottom of the urn is measured
precisely. (6) The excess clay is cut away.(7) In order to link the
bottom with the sides, it is slightly broadened with a mallet.
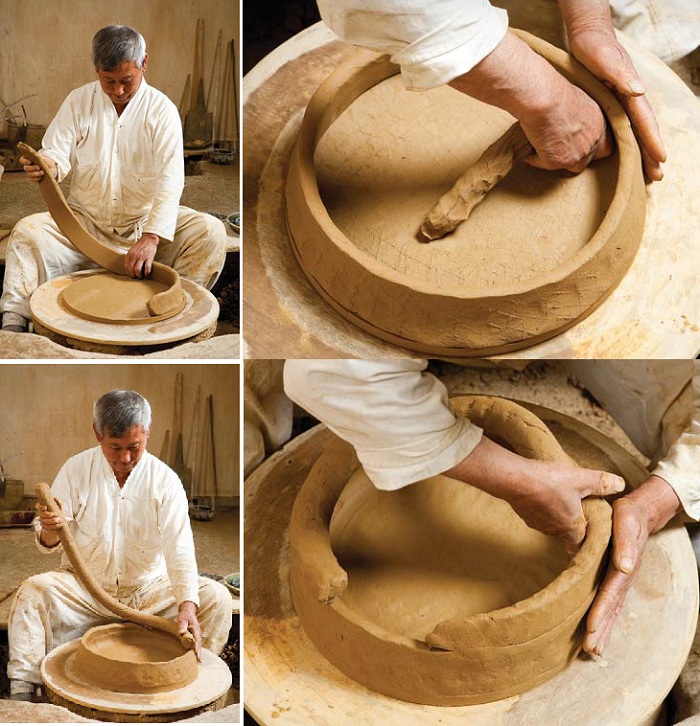
(8)
The artisan shapes the pottery from the base, forming each layer by
hand. (9) It is essential to firmly connect the bottom of the urn with
the first layer. (10) Each subsequent layer of clay is carefully placed
atop the lower layers. (11) The artisan uses his hands to shape the
sides of the urn.
(12)
The craftsman continues with the upper layers of the side.(13) The
potter can use both hands and tools. The left hand, inside the urn,
holds the sides in place as the right hand, outside the urn, taps the
sides to make the thickness even. (14) Smooth the surface of the sides
using a geungae. (15) Trim the inside of the urn.
(16)
The pottery is shaped upward by hand. (17) The craftsman can use both
hands and tools at the same time. The left hand, on the inside, holds
the sides steady while the right hand, on the outside, taps the sides to
make them even. (18) The potter carefully measures the circumference of
the urn, making sure it's even. (19) Each later is securely connected
to the lower layers using the fingers.
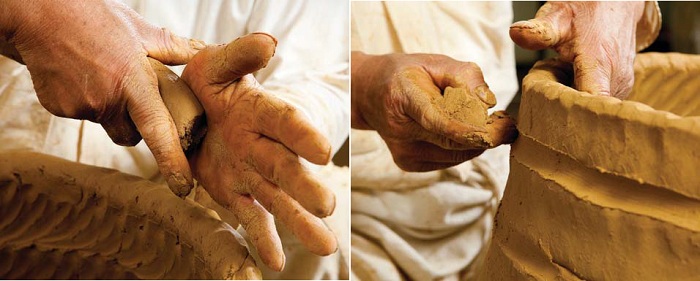
(20)
As the layers of the side are put in place, the craftsman uses his
index finger to "pinch" the two layers together. (21) The outside of the
urn is also sealed using the fingers.
(22)
The pottery is shaped by hand from the base and up the sides. (23) When
shaping larger urns, the potter places a brazier of wood charcoal
inside to help dry the clay and to help prevent the walls from
collapsing as he continues to work.
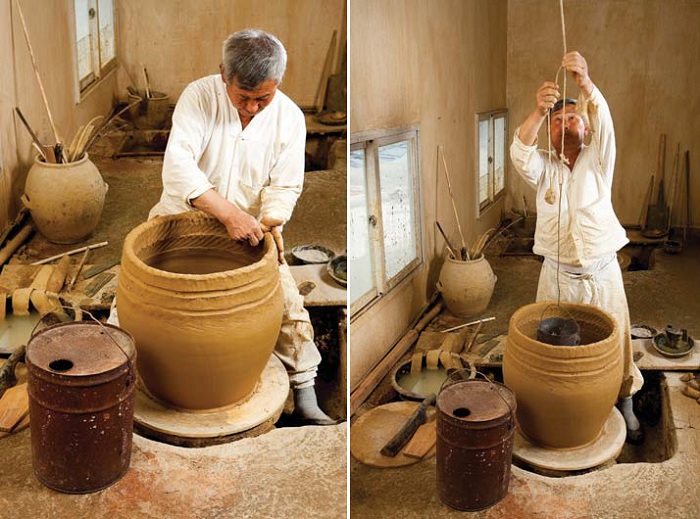
(24)
Hanging a burning brazier inside the unfinished urn helps to dry the
clay as the artisan continues to shape the sides. (25) The craftsman
hangs a charcoal-burning brazier inside the unfinished urn as he trims
the sides with a geungae, a tool used for trimming. (26) The potter
measures the height of the urn with a graduated length of wood.
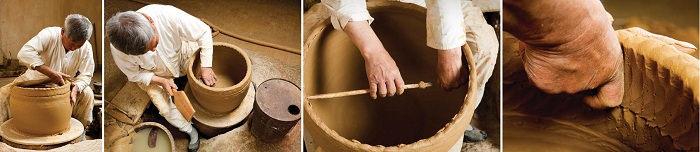
(27)
The artisan trims the sides of the urn with a geungae. (28) A length of
rope helps the potter to shape the sides of the larger urns. (29) The
final layers of clay are laid for the upper edge of the sides. (30) The
craftsman uses a tool in each hand to finalize the proper shape of the
sides.
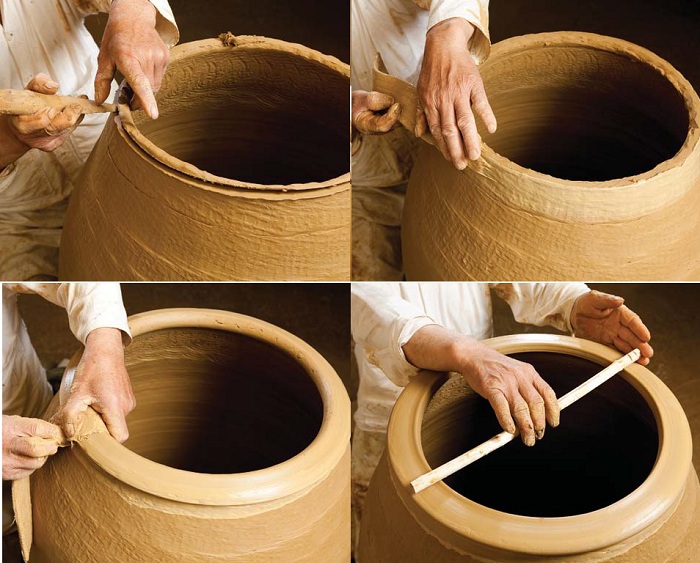
(31)
Excess clay is cut away along the lip. (32) A cloth or a strip of
leather is used to shape the final opening. (33) The final lip is shaped
with a strip of cloth or leather. (34) The potter measures the width of
the opening, making sure the urn is properly balanced.
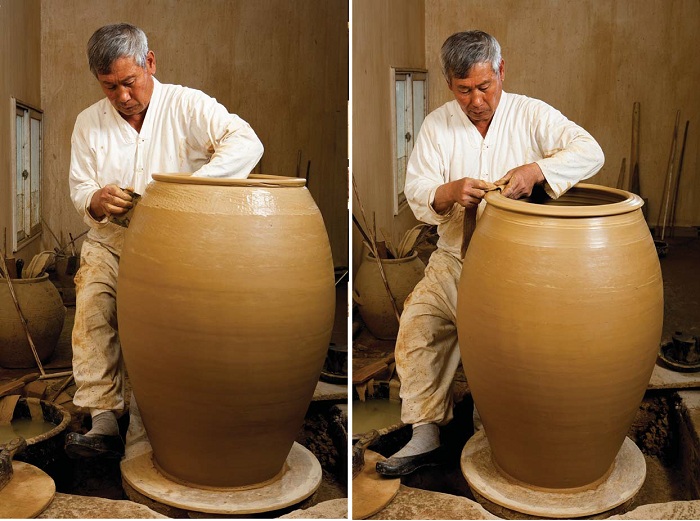
(35)
The artisan uses a geungae to trim to top of the almost-finished urn.
(36) The craftsman uses a strip of cloth or leather to smooth the upper
lip of the urn.
(37)
The potter makes an intaglio, or indented, pattern along the inner
sides of the urn. (38) A square of leather is used to make an indented
pattern, an intaglio, along the outside of the urn. (39) Simple indented
patterns can be made by hand along the outside of the urn. The final
work of pottery must be cut from the potter's wheel before being placed
in the kiln.
40. The raw urn is finally finished.
*This series of article has been made possible through the cooperation of the National Research Institute of Cultural Heritage. (Source: Intangible Cultural Heritage of Korea)
Comments
Post a Comment